Showing posts with label Aeroponics. Show all posts

Saturday, December 25, 2010

Aeroponics Deconstruction

     As I prepare for my trip to France, I have to get ready to move most of my stuff back into my parents' place. This includes taking apart my aeroponics setup for transport. This is the first time I've taken apart the system since I set it up. I ran across several surprises.

     First off, I think some of the plants did develop a little root rot. Particularly the onion plants which had no root really to speak of. Second, the roots of many of the plants extended too far! They grew all the way down into the water reservoir, removing any control I had over their nutrition or water uptake. Maybe it would be a good idea to have a separate tank for the water/nutrient solution.

     Another surprise was how dirty the water had gotten. None of the sprayers were clogged and there was no trouble with the pump, so the pump filter must have sufficed.

 
      Since it was dirty, everything needed to be cleaned. I started out by cleaning out the net pots. Those were easy enough. I dumped out all the clay pellets into a bucket (strands of roots and all) and used a scrub brush in the sink to wash off the pots.


     Next, I had to clean out the clay pellets to use again. The problem was how to get the little root hairs off the pellets, without having to do it all by hand which would have taken ages. I tried boiling all the pellets in a big pan. I got the heat up to boiling and then stirred the pellets often. I hoped that the roots would boil down into a pulp like spinach does in order to clean off the pellets. Unfortunately it didn't work! I just had a lot of warm, root-covered clay pellets. Hmm... I think a strong garden hose and some 1/4" wire mesh would do wonders.


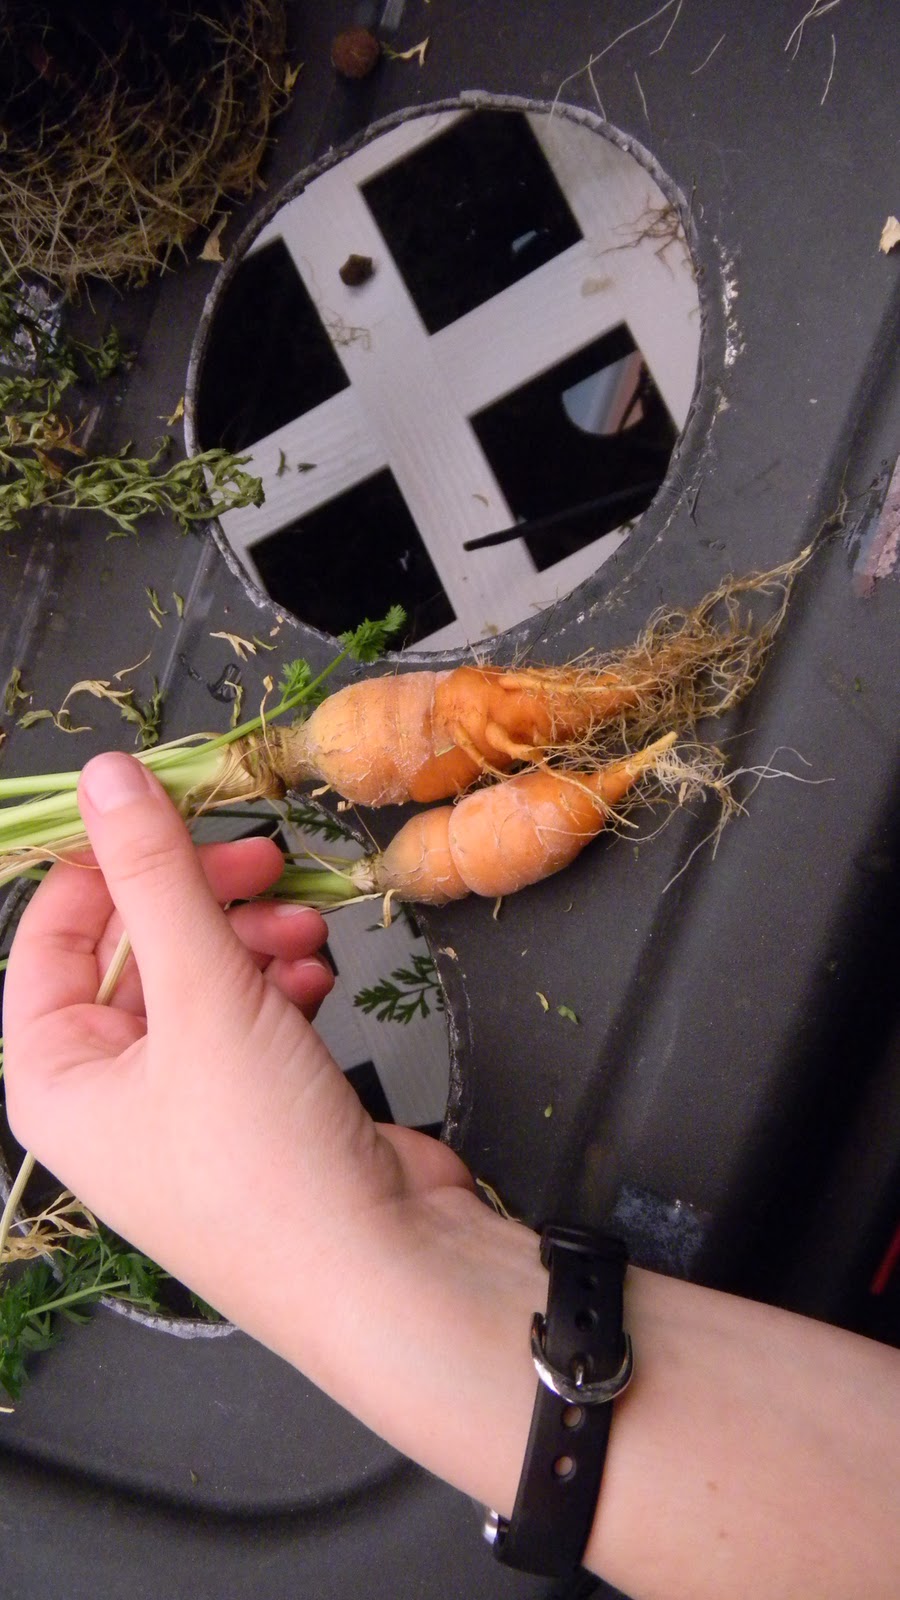
     One pleasant discovery was two carrots. They grew pretty well for not being in soil. I washed them off just to get off any excess nutrients, but besides that, no dirt to scrub!


Monday, October 25, 2010

Sugar Snap Pea Pods


So far I have discovered four pea pods. There are still several blossoms left and even more budding. I'm so excited to have some home grown sugar snap peas for the first time in years!

Friday, October 22, 2010

Sugar Snap Pea Blossoms!


About a half dozen to a dozen flowers and flower buds seem to have shown up almost overnight. I did some research about how to pollinate sugar snap peas, and it appears they can either be cross bread or self-pollinated. As I only have one type of plant anyway, self-pollination is the best. It is even ideal.


Tuesday, October 19, 2010

New Watering Scheme's Effect


 I was out of town for a few days and before I left I changed the watering scheme for the plants. Previously the plants had been watered four times during a 14 hour day, for five minutes at a time. The plants were looking dry (the leaves were wilted and brownish). Initially I had thought the problem was nutrient concentration and changed the solution. Unfortunately, that only prolonged the real problem of dehydration.

So the new program waters the plants for eight times during a 14 hour day, for two minutes at a time. The reduced water time is because the roots are saturated rather quickly, and after that point, additional spraying doesn't increase the water coverage.

When I arrived home I saw the plants were doing very well! The lettuce, which was particularly effected by the water shortage were now huge.


A particularly large lettuce plant was stunting the growth of nearby lettuce plants. This indicates that the plants are too close together at this size. I rearranged the lettuce plants to have as little overlap as possible. I plan to eat the outer leaves of the largest lettuce plants so that they all stay a reasonable size. I'll try to keep the plants as big as the lower two in the picture below or smaller.


The rest of the plants are also doing better. The peas are still floppy, and I forgot to pick up some stiff wire mesh to make cages out of for them. The broccoli and cauliflower plants look very strong and the stems are pretty tough. I expect it will still be quite a while until flowering though judging by the thickness of the stalk when they're sold in stores compared to the current thickness.


Thursday, September 30, 2010

Roll-up Blinds


Previously I used a shower curtain with reflective coating attached to block and reflect light from the aeroponics unit. Unfortunately that meant it was a real pain to access the plants even though I could lift up the curtain from the lower right and clip it to the top of the shelves. Now I have invested in two roll-up window blinds.

Both blinds needed to be trimmed to size. The curtain itself could be cut with scissors. The hollow steel rod could be cut with a handsaw or band saw. I took about 10" off each curtain, one originally 53" and the other originally 24".


A roll-up blind on the front and on one side provide more than adequate access to the plants, lights, and electronics. The remaining two sides were covered with a permanently mounted shower curtain with reflective film. About four inches of overlap around the corners helps keep the light in.


Now I have perfect access to the growing plants! I apologize for the unfocused pictures, my camera has started acting very strangely. I'll try to get it fixed before I work on more projects.


Monday, September 20, 2010

Plant Growth Update


The plants are doing very well!
The lettuce is getting pretty sizable; perhaps time to try a leaf or two. (day 14)


The peas also have shown significant growth. I will need to get working very soon on a support system for them since I don't want them sprawled all over the place making it impossible to lift out the net pots if need be.


The broccoli and other plants look pretty healthy. However I did find some slight damage on one of the broccoli leaves. I didn't think there would be any pests in my room. Perhaps it is light damage from getting too close to the bulbs early on? Somehow I doubt it, but the alternative is less pleasant.


The roots are really starting to develop. The onions and carrots are both doing well, but surprisingly they don't have any visible root growth outside the net pots. The lettuce has some small roots (day 14).


The broccoli has even smaller roots, but on the other hand it is growing out of a much larger net pot (day 20).

The pea roots were super impressive! (day 7)

Nutrient Mixing and Monitoring


The following tools have been purchased to provide maximum growing nutrients for the plants:

First thing's first, calibrating the meters.

Pour some of the pH 7.0 buffer solution into a cup. Remove the cap and submerge the pH meter. It should be around 7.0. Mine was a 6.4 so it needed some calibration with the included flat head screw driver.


To calibrate the TDS meter you should probably also pour some solution into a small container. I don't have too much buffer, so I calibrated for the first time directly in the container. I know this is a big no-no, but the meter was fresh from the case and perfect accuracy may not be so important. It was close enough to be calibrated for my purposes.


Now that calibration is complete, we need some baseline measurements.

I got a half gallon of tap water then mixed in the appropriate amount of Pure Blend Pro Grow as recommended for seedlings (1.5 teas / gal so 0.75 teas/half gal). Using the TDS meter, I measured 243 ppm. Using the pH meter I measured 6.5. This was the perfect pH! All my plants grow best between a pH of 6.0-7.0.

Next I measured the ppm and pH of the nutrient solution that has been in use the last 2-3 weeks while the plants have been sprouting. The pH was 6.1 which indicates that as the plants use the solution, the pH goes down and some pH UP may be needed. However much to my dismay, the ppm was 362. I think this is likely caused by either plant waste or dust from the clay pellets. The only solution is to replace the entire batch of nutrients to get a good reading. To avoid this problem in the future, I will potentially add an internal filter; probably one designed for an aquarium. This regulator is needed so that I can use the lowering of ppm to determine how much nutrient solution to add as time goes on.

Monday, September 13, 2010

Plants taking shape

Now just two weeks after transplanting the first seeds over to the aeroponics system, the plants are becoming recognizable. All except the peas of course, which were just planted two days ago. The very first leaves are starting to show up though.


The lettuce looks the best. Seven little lettuce plants that I can clearly recognize by the distinctive leaf shape and pattern.

Not being too familiar with the way cauliflower and broccoli grow, it doesn't look that recognizable to me. The cauliflower below looks quite similar to the broccoli (2nd picture down). All those plants seem to be pretty healthy though, so that's good.


Finally the two carrots are doing pretty well. Hopefully more little leaves will sprout making it look even more like the familiar carrot plant.


Somehow I forgot to take a picture of the single onion plant. Not a big deal though, as it is just one green shoot. There are no leaves and the tip is whitish. I suppose that is typical for the onion family, but it would be nice if some more leaves would show signs of budding. Tonight I will break out the meters and see if the plants are getting enough vitamins to make them big and strong, or if I'm just feeding them water.

Thursday, September 9, 2010

Pea Germination


To sprout pea seeds I soaked them in water for 24 hours. I then put them in damp paper towels in a ziplock bag for two days. An amazing 100% of the seeds germinated! Now that I've transplanted them into the aeroponics system, all the plants have been planted. The next step is to build a small support structure for the pea plants (grow a couple feet tall or a couple feet along the ground if not supported). After that I need to start using sensors. I'm not sure what the concentration of nutrients is now that it's been running for a while and I'll need to know when to add more.

Tuesday, September 7, 2010

Simple Arduino SSR Controlled AC Extension Cord or Outlet

***Disclaimer***
Working with wall AC electricity is very dangerous. Make sure everything is unplugged while you are working on wiring. If in doubt, always assume it is live.

Also note: The relay I used does not "click" when it switches state, so do not use that as a test of whether your code it working or not.


Requires:

Arduino
Solid state relay (here's the one I used ~1.5 week delivery)
Small gauge wire
Electrical tape
Extension cord

Step 1: Strip a section of the extension cord so that two (or three if there's a ground pin) wires are showing. Sometimes the ground will also be a metal sheath around the other two wires. In this case the cord just has a hot and a neutral wire. The black is usually hot. The hot wire is the one which the relay is going to be wired to. If you wire it to the neutral wire, then if the relay's input is low, it doesn't mean that there is no electricity to the load, just no complete circuit through the wire.


Step 2: Cut the black wire to make two ends. Strip both ends to connect to the relay.


Step 3: Use a screwdriver to round the bare leads if desired, then screw them down to the two loads on the relay. Be sure to look at the datasheet for the relay to know which pin should come straight from the wall and which should go out to the load. The datasheet for the relay I used can be found here. It's an HFS15 made by Hongfa Technology.


Step 4: Use electrical tape or other insulation to be sure that all metal is covered. It would be very dangerous to leave the screw heads here exposed because anything conductive could bridge the two points and get zapped by 110 V.


Step 5: Use two short small gauge wires to connect to the input line of the relay. These wires will go to the arduino, so be sure they fit inside the connectors.


Step 6: Next task is to program the arduino and wire the relay to the arduino. The pins you plug your control lines to will of course change based on your programming. However you program it though, the ground of the input signal will go the "GND" pin on the arduino. The other wire will go to a digital I/O pin. When the pin is set to HIGH it will turn on the flow of electricity to the load. When it's turned to LOW or if the arduino loses power, it will turn off the flow of electricity.


I admit, it looks really ugly. I may get a project box or something to put all the connections in to make it water proof and neater.


I am using this to control lights and water for my aeroponics system so that if I'm gone for a weekend I don't need to have someone come over and babysit my plants. That being said, the code I wrote is very bad and basic. It gets the job done but is definitely not my final code.

Monday, September 6, 2010

Aeroponics Light Shield/Reflector

Turns out the advice about sprouting lettuce in the fridge was true. I left the seeds in damp paper towels inside a ziplock bag in the fridge and a couple days later almost all of them were sprouted. My fridge stays between 40 and 45 degrees. Above you can see the little lettuce sprouts.


Today's project was putting up reflective lining/light blocking material. The Mylar came in a big roll. It is very shiny but not very stiff. So, I attached it to a shower curtain for support and additional light blockage.


The shower curtain was stapled together to keep it water proof and in place.


To attach to the frame of shelves, I used some small zipties and the occasional binder clip.


The light meter I have indicated that this lighting produces 72,000 foot-candle hours which translates to just over twice the minimum requirement to be considered "full sun." I don't think having this much light is a bad thing, as the plants seem to be doing just fine. It is easy to dry out plants though if they aren't watered properly.